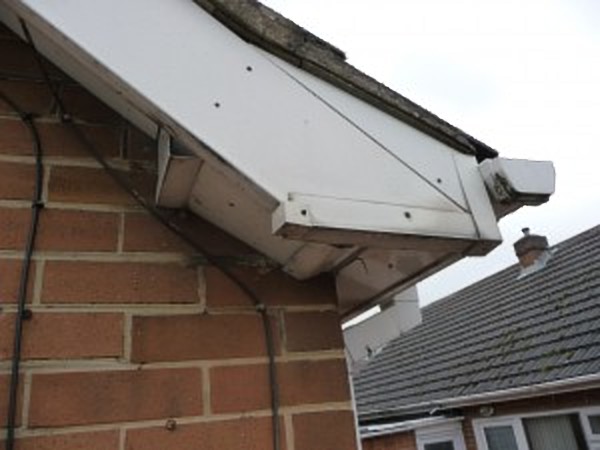
How to Paint Fascia Boards
This entry was posted on Jul 16, 2013 by Tom McAteerThe problem with painting fascia boards is that after looking resplendent for a relatively short period of time and adequately performing the task they were intended for, the effect of our often inclement weather soon kicks in, leaving them looking a little less than perfect. The paint can blister, peel off, and in time the timber will start to deteriorate and rot.
It might seem that the only solution to this problem is to re-paint your timber fascias every few years to maintain their appearance and protect the wood underneath. This takes time, and inevitably a considerable amount of money, especially if you have to employ the services of a local contractor.
Most of us have bigger fish to fry than the constant maintenance of fascia boards, and thankfully we can rid ourselves of this expense and inconvenience year on year by replacing timber fascia boards with UPVC fascia boards. These products give a smart, clean and stylish look to any property and come with the added bonus of a guarantee which can last up to 50 years (the longest in the industry) against warping, cracking, discolouring or blistering. Thankfully, painting your old timber fascias has become a thing of the past.

How to Paint Fascia Boards
Step 1: Put down a drop sheet under the work area to catch all the paint scrapings. This will help to contain the scrapings, making the clean-up job much easier afterward. Next, you will want to remove the guttering, giving you full access to the fascia boards.
Step 2: Start scraping using a thin paint scraper. It isn’t a glamorous job but it is a necessity that needs to be done prior to painting. Any boards that are rotten will show up clearly at this point as the scraper will go straight through the wood.
Step 3: If you find any gaps or holes then these will need to be repaired with wood filler and left to dry. Once dry you will need to sand it and any other rough patches to provide the smoothest possible finish to the job.
Step 4: Apply a wood preservative to the fascia boards; this can be done either with a brush or by spraying it on. Typically preservative coatings need to be left overnight to dry.
Step 5: Priming time! Now that everything is prepped, it’s time to apply primer – remember it’s little and often at this stage. Check the tin of paint that you’re using to find out what the drying times are and then leave the first coat to set. Don’t forget to wash your brushes!
Step 6: Once the paint has dried you can go about ensuring the surface is smooth by sanding lightly with a medium disc and then apply an undercoat. Once this has been applied and left to dry, give the fascia a final sanding to ensure that the surface is clean and primed for the final coat.
Step 7: Now you can apply the final glossy coat to your fascia, painting it the colour you want. Make sure that the paint is applied evenly across the boards, giving the best possible finish to your job. Once this coat is on and dried, replace the guttering then stand back and admire the product of all your hard work!
If this sounds like a bit too much hassle, then check out our how to install UPVC fascia boards guide and you can forget about needing to paint your fascia ever again! Whatever you decide, make sure you buy your products from Speedy Plastics and Resins and you’ll be assured a high-quality finish.
At Speedy Plastics and Resins we offer an extremely extensive range of plastic fascia boards in a wide range of thicknesses, colours and sizes. All of our plastic fascia boards are manufactured by Freefoam, one of the UK’s leading suppliers of building products. They have an enviable name in the industry for producing top quality products that look great and last for years.
If you’re embarking on any other DIY project, browse our range of products. If you find the same product anywhere else for less, we’ll refund the difference.